Smart Home BTO Singapore: The Complete Planning & Budget Guide Before Your Keys Arrive

Your BTO keys are months away. The renovation mood board is growing. But if smart home planning isn't part of the conversation yet, you're about to make the most expensive mistake of your entire renovation.
Short answer: The best time to plan a smart home in your BTO is before your electrician starts work, not after you move in.
Neutral wires, data cables, hub placement, and sensor positions all need to be specified during the electrical first fix, typically 2-3 weeks into renovation. Miss that window, and retrofitting costs 3-5x more, looks worse, and limits your options permanently.
Why BTO Owners Have the Biggest Advantage (And Most Waste It)
Because a BTO is a blank slate. No existing wiring to work around, no old switch boxes, no previous owner's questionable electrical decisions. You get to do it right from the start.
Resale flat owners spend thousands hacking walls to pull neutral wires and reroute cables. BTO owners? Your electrician is already running fresh wires to every switch and socket. Adding the smart home wiring specification at this stage costs a fraction of what it would after the walls close.
The problem is timing. Most BTO owners only think about smart home tech after the renovation is done, usually after seeing a friend's setup or a Qanvast feature. By then, the walls are plastered, the tiles are down, and every cable run means hacking, patching, and repainting. What would have cost $800-$2,000 during renovation now costs $4,000-$8,000 in rework, and it still won't look as clean.
Home-A-Genius has been installing smart homes in Singapore HDB flats since 2017. The single most common thing we hear from clients who come to us post-renovation: "I wish I'd planned this earlier."
The BTO Smart Home Timeline: When to Do What
Most renovation guides tell you to start planning 2-6 months before key collection. Smart home planning should be part of that timeline, not a separate project you figure out later.
6 months before keys: Start thinking about what you want your home to do. Lights that turn off when you leave? Curtains that open with the sunrise? Aircon that kicks in before you get home? You don't need to pick specific products yet. You need a direction.
3-4 months before keys: This is when you should be talking to a smart home consultant alongside your interior designer. The consultant reviews your ID floor plan and produces a wiring specification: every cable run, every power point, every device position. This document goes to your electrician.
Key collection + renovation start: Your contractor submits the HDB renovation permit. Within the first 2-3 weeks, the electrical first fix happens. This is the critical window. Every smart home wire, cable, and power point must be specified and installed during this phase.
After first fix: Walls get plastered, tiles go down, carpentry goes in. After this point, adding hidden wiring is no longer possible without hacking.
Post-renovation: Smart home devices are installed. Switches replace standard faceplates in the same back boxes. Sensors mount to ceiling points. The hub and gateway sit inside the DB or storeroom. If the electrical phase was planned correctly, installation day involves zero hacking.
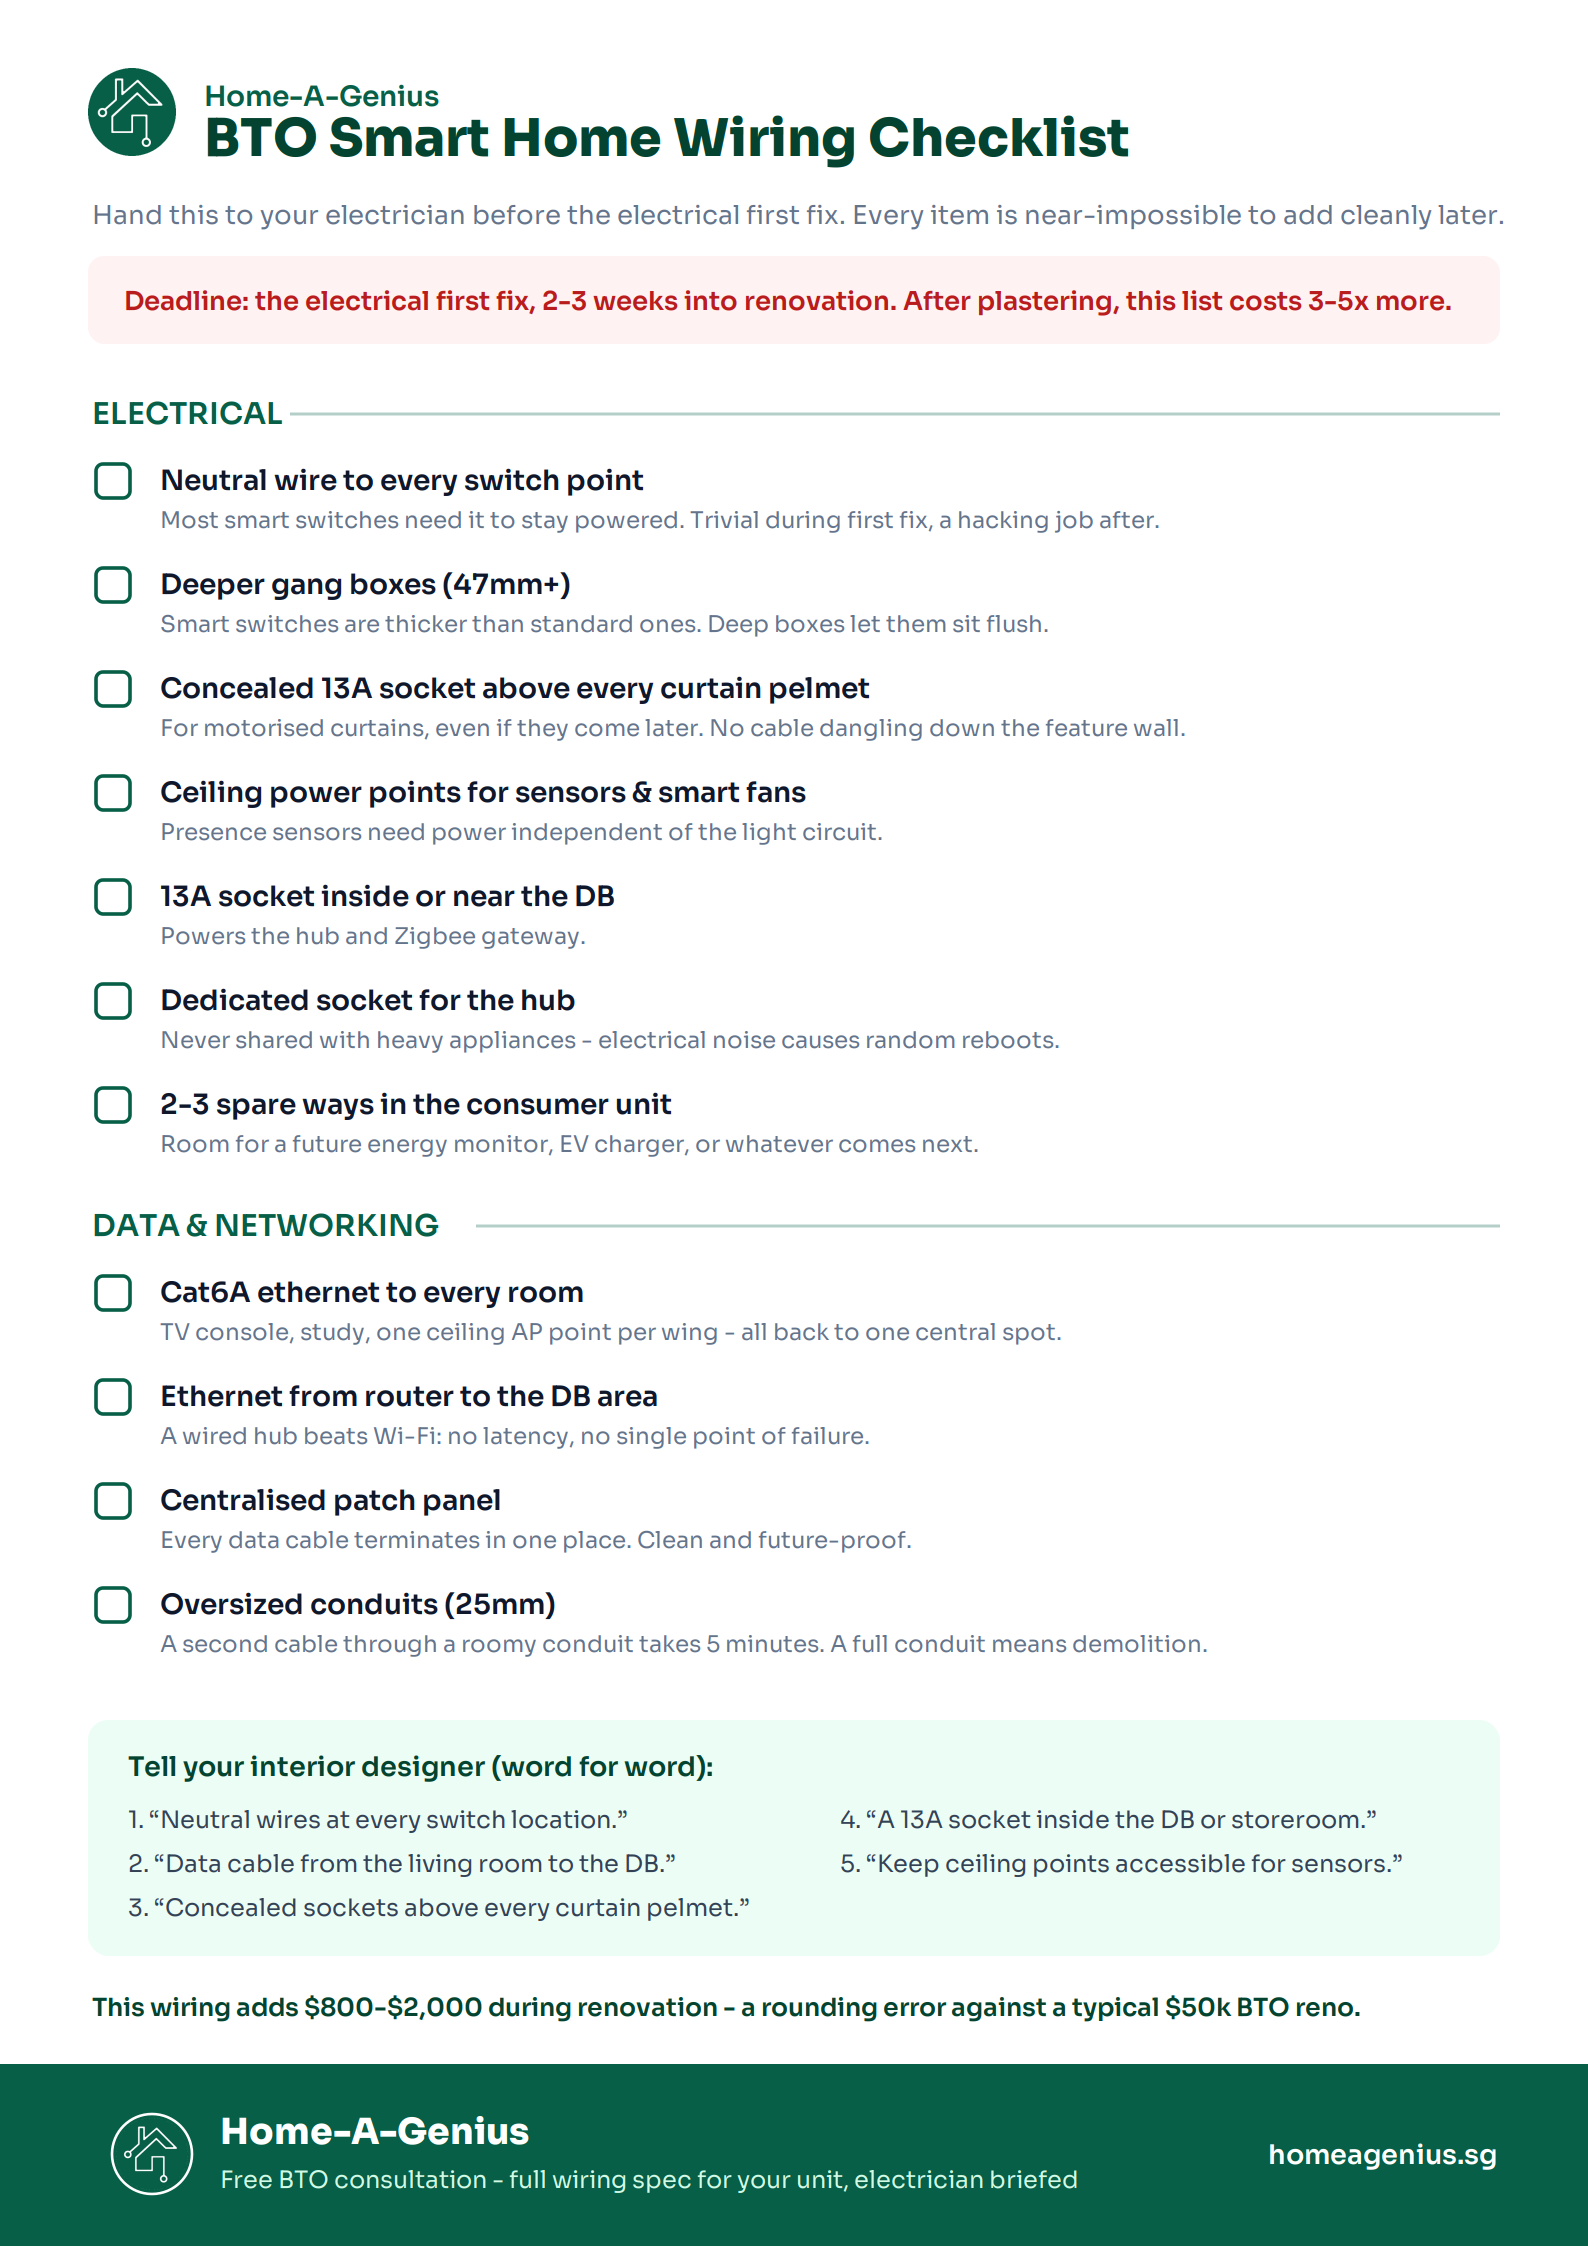
The Wiring Checklist Your Electrician Needs (Print This)
These items are nearly impossible to add after renovation without hacking walls. Discuss every one with your electrician before the first fix begins:
Electrical:
- Neutral wire to every switch point. This is the single most important smart home investment in your BTO. Most smart switches require a neutral wire to stay powered when lights are off. Your electrician pulls these during first fix at negligible extra cost. After walls are plastered, adding neutral wires means hacking. While "no-neutral" switches exist, they often cause LED flickering or need bulky capacitors. For $500-$1,200, neutral wires to every switch point gives you full compatibility with any smart switch brand, now and in the future.
- Deeper gang boxes (47mm+). Standard HDB gang boxes are shallow. Smart switches are thicker than dumb ones. A deeper box means the switch fits flush without forcing wires.
- Power point at every curtain pelmet. Motorised curtains are the highest-satisfaction smart home upgrade in a tropical flat. You wake up to light instead of an alarm, and the curtains close automatically against the afternoon west sun. But the motor needs a concealed 13A socket above the pelmet. Without it, you get a white cable dangling down your feature wall.
- Ceiling power points for sensors and smart fans. Presence sensors need power independent of the light circuit. One dedicated wire run during first fix solves it permanently.
- A 13A socket inside or near the DB. Your smart home hub and Zigbee gateway need power. One socket in the DB area is enough.
- Dedicated power socket for the hub. Don't share it with heavy appliances. Electrical noise from vacuum cleaners or washing machines can cause random hub reboots.
- Spare ways in the consumer unit. Ask your LEW for 2-3 extra circuit breaker slots. You'll want them for a future energy monitor, EV charger, or something that doesn't exist yet.
Data and networking:
- Cat6A ethernet to every room. At minimum: TV console, study, one ceiling point per wing for a wall/ceiling-mounted access point, and back to one central location. Cat6A supports 10GbE over any distance found in a flat, and the cost difference over Cat6 is trivial. HDB concrete walls kill Wi-Fi signals. A single router in the living room won't reach the master bedroom reliably. Ceiling-mounted access points with wired backhaul outperform any mesh Wi-Fi system.
- Ethernet from the router to the DB area. This lets the hub connect to your network by cable, not Wi-Fi. A Wi-Fi-dependent hub introduces latency and creates a single point of failure.
- Centralised patch panel. All your data cables terminate in one spot. Clean, maintainable, future-proof.
- Oversize your conduits. Pulling a second cable through a 25mm conduit that already has one cable is a 5-minute job. Pulling one through a full 20mm conduit is a demolition job.
5 Things to Tell Your Interior Designer
Your ID doesn't need to become a smart home expert. They just need these five instructions:
- "I need neutral wires at every switch location." This is non-negotiable. Brief your electrician during the first meeting.
- "I need a data cable from the living room to the DB." This powers the hub. One cable, run during electrical first fix.
- "I want concealed power points above every curtain pelmet." For motorised curtains, even if you're not installing them now.
- "I need a 13A socket inside the DB or storeroom." For the hub and gateway.
- "Leave these ceiling and wall points accessible for sensors." Presence sensors need specific mounting angles to avoid false triggers from ceiling fans, curtains, or pets. That means understanding the room layout and airflow, not just sticking one in the middle of the ceiling.
If your ID pushes back on any of these, it's usually because they haven't worked on smart home projects before. These are standard electrical additions, not structural changes. They add minimal cost during renovation and zero cost in hassle.
The Bomb Shelter Problem (Every HDB Owner Needs to Know This)
Every HDB flat built after 1997 has a household shelter. It's built to SCDF specifications with thick reinforced concrete walls and a steel blast door. It's designed to withstand explosions, which also makes it a signal black hole for Wi-Fi and Zigbee.
Here's the Singapore-specific trap: the fibre termination point and DB are frequently inside or beside the shelter. Homeowners naturally want to make it the network cabinet. But HDB's rules do not permit hacking or drilling the shelter's reinforced walls, ceiling, or floor. Only shallow inserts for removable fixtures (no deeper than 50mm) are allowed. The blast door, frame, and ventilation plate cannot be altered or sealed.
That means no chased conduit into or out of the shelter. Your options are surface trunking through the existing door opening (ugly but legal), or, better, plan the network cabinet outside the shelter from the start and have the LEW route the incoming fibre and a power spur to it. Decide this before the carpenter builds cabinetry, not after.
The bomb shelter also kills smart home signals. We've seen setups where a master bedroom curtain motor kept disconnecting because the Zigbee signal had to pass through the shelter wall to reach the hub. Moving one smart plug into the corridor as a Zigbee repeater fixed it permanently. This is standard practice for any professional installer, but completely missed in DIY setups.
What to Install Now vs What Can Wait
A smart home is modular. You don't need to buy everything on day one. But you need the wiring for everything on day one, because that's the part you can't add later.
Install during renovation (the foundation):
- Smart switches throughout the flat. They replace standard faceplates in the same back boxes. Control every light from the app, by voice, or through automation.
- Hub and Zigbee gateway. This is the brain. It stores all automations and runs them locally, without cloud dependency. If your Singtel fibre drops at 2am, your "Goodnight" scene still works.
- Networking infrastructure. Router, access points, and a separate network for smart devices with proper coverage across the entire unit.
- IR blaster for aircon control. Turn the aircon on before you reach home, set it to switch off when no one's in the room. Works with any aircon brand that has a remote.
Add anytime later (no rewiring needed):
- Motorised curtains (if you pre-wired the pelmet sockets)
- Motion and door sensors (battery-powered, adhesive mount)
- Smart lock and video doorbell
- CCTV cameras
- Smart plugs for appliances
- Voice assistants
The key principle: infrastructure now, devices whenever you're ready. Every system Home-A-Genius installs is modular. You can start with switches, a hub, and networking, then add curtains, sensors, and cameras months or years later without replacing anything or rewiring.
Why Zigbee Beats Wi-Fi in HDB Flats
If you've been researching smart home gear on Shopee or Lazada, most budget devices run on Wi-Fi. In a showroom, they work fine. In an HDB flat with reinforced concrete walls and 30 neighbouring Wi-Fi networks competing for the same channels, they don't.
The problem with Wi-Fi smart devices in HDB:
- Every device competes for router bandwidth
- Concrete walls cause severe signal degradation (NIST testing shows 200mm of reinforced concrete causes around 31dB of signal loss at 2.4GHz)
- Dense HDB blocks mean massive channel congestion on 2.4GHz
- If your internet drops, every cloud-dependent device goes offline
Why Zigbee is better for most smart home devices:
- Creates a self-healing mesh network where each mains-powered device acts as a signal repeater
- Operates independently of your Wi-Fi, so congestion doesn't affect it
- Low power consumption for battery-powered sensors
- Only the hub needs an internet connection (for remote access). Automations run locally even without internet.
This is why the Home-A-Genius system runs primarily on Zigbee, with the hub processing everything locally. Your smart switches, sensors, and curtain motors communicate over Zigbee mesh. Your aircon is controlled via IR. Only the hub itself touches your Wi-Fi network, and even then, it works without it.
How Much Does Smart Home Wiring Cost During a BTO Renovation?
The wiring itself (neutral wires, data cables, power points) typically adds $800-$2,000 to your electrical bill during renovation. Against a BTO renovation budget that routinely clears $50,000 for a 4-room flat, it's rounding error.
For context, here's what things cost if you try to add them after renovation:
| Item | During renovation | After renovation (retrofit) |
|---|---|---|
| Neutral wire to all switches | $500-$1,200 | $3,000-$5,000 (hacking + patching + repainting) |
| Cat6A ethernet to all rooms | $800-$2,000 | $3,000-$6,000 (surface trunking or hacking) |
| Power point at curtain pelmet | $80-$150 per point | $400-$800 per point (hack + patch + repaint) |
| Ceiling power for sensors | $60-$100 per point | $300-$600 per point |
The pattern is clear: everything is 3-5x cheaper during renovation. The wiring is the only part of a smart home setup you genuinely cannot redo cleanly.
For the full smart home system (hub, switches, gateway, networking, sensors, automation programming, and professional installation), Home-A-Genius packages start from $4,000+ for a standard BTO unit. No subscription fees, local processing, 2-year warranty, and lifetime remote support included.
Singapore Regulations You Need to Know
Smart home wiring isn't a DIY weekend project in Singapore. Here's what's legally required:
- Licensed Electrical Worker (LEW): All electrical work, including rewiring for smart switches, adding circuits, and modifying the DB box, must be done by an LEW under the Electricity Act. Your renovation contractor should engage one.
- HDB renovation permit: Required for all renovation work. Your contractor submits it after key collection. All work must be completed within 3 months of permit issue.
- No structural wall hacking: Cables must go through existing conduits or non-structural walls. You cannot hack into columns, beams, or load-bearing walls.
- Bomb shelter restrictions: No hacking or drilling into shelter walls, ceiling, or floor. Blast door and ventilation cannot be altered.
- HDB-registered contractor: Your renovation contractor must be in HDB's Directory of Renovation Contractors. This is a legal requirement.
None of these are obstacles if you plan ahead. They only become problems when homeowners try to retrofit after the fact.
The Home-A-Genius BTO Process
Every Home-A-Genius BTO project follows the same four steps:
- Design consultation. We review your ID floor plan, assess your flat layout, and specify every electrical requirement. You get a diagram showing each device, cable run, and network node, tailored to your specific unit.
- ID coordination. We brief your electrician and interior designer on the exact wiring specification before the first fix begins. No ambiguity, no missed items.
- Pre-staging. Devices are configured, updated, and paired before we enter your home. Installation day is about mounting and connecting, not troubleshooting firmware.
- Installation. Network, hub, switches, sensors, pairing, and full automation programming. Typically 6-10 hours for a standard BTO. When we leave, everything works.
The consultation is free, and there's no obligation. If you're still waiting for keys, this is the ideal time: we can prepare everything so the wiring spec is ready the moment your renovation kicks off.
Founder's Take
"The BTO waiting period feels like dead time, but it's actually the most valuable planning window you'll get."
I've seen hundreds of BTO owners go through the same cycle. They spend months choosing tiles and cabinet colours, which is fine, those matter. But nobody tells them to plan the electrical infrastructure for a smart home until it's too late.
The thing is, your tile choice doesn't lock you in. You can change a backsplash in a weekend. But wiring? Once cement dries, your options are permanent.
If you're 3 months or more from key collection, you're in the sweet spot. Get your ID drawings to a smart home consultant now. The spec takes one session to produce, your electrician adds it to the first fix, and you've just future-proofed your home for the next 10-20 years at a cost that rounds to zero against your total reno budget.
If you've already collected keys and renovation hasn't started, you still have the window. If the electrical first fix is done, the window is closing, but talk to us anyway. We've worked with every stage.
If the renovation is finished? We can still make it work. It just costs more and looks less clean. Better late than never, but better early than late.
— Cheryl, COO - Home-A-Genius
FAQ
When should I start planning a smart home for my BTO?
Before renovation begins, ideally 3-6 months before key collection. The critical deadline is the electrical first fix, which happens 2-3 weeks into renovation. Every smart home wiring requirement must be specified before that point.
How much does smart home wiring add to a BTO renovation?
Typically $800-$2,000 for the wiring infrastructure (neutral wires, data cables, power points). The same work done as a retrofit after renovation costs 3-5x more. Full smart home system installation (hub, switches, sensors, automation) starts from $4,000+ with Home-A-Genius.
Do I need to install all smart home devices during renovation?
No. You need the wiring infrastructure during renovation (neutral wires, data cables, power points at key locations). The actual devices, switches, sensors, curtain motors, cameras, can be added anytime later without rewiring, as long as the wiring foundation is in place.
Can my HDB renovation contractor handle smart home wiring?
Your electrician (who must be a Licensed Electrical Worker) can pull the cables, but they need a specification telling them exactly what to run and where. That specification comes from a smart home consultant who understands device requirements, signal coverage, and network planning. Home-A-Genius produces this and coordinates directly with your electrician.
Is Wi-Fi enough for a smart home in an HDB flat?
For most devices, no. HDB concrete walls cause severe Wi-Fi signal degradation, and dense blocks create massive channel congestion. A Zigbee-based system with a local hub is far more reliable. Zigbee creates a mesh network where devices relay signals to each other, and automations run locally even without internet.
What's the difference between DIY and professional smart home installation?
DIY means buying individual devices, installing them yourself, and troubleshooting through YouTube and Reddit. Professional installation means a site-assessed system designed for your specific flat layout, with proper hub placement, Zigbee channel configuration, signal coverage planning, and aftercare support. The hardware might be similar, but installation and configuration make or break the experience.
Will a smart home increase my BTO's resale value?
A well-installed smart home system (especially one with clean hidden wiring, quality switches, and a local hub) is increasingly attractive to buyers. It signals a well-planned renovation. The bigger value, though, is daily quality of life: automated lighting, climate control, security, and convenience for the years you actually live there.
Book a free consultation — tell us your BTO project, flat type, and renovation timeline. We'll advise on what wiring to specify and what system makes sense for your layout, no obligation, no subscription lock-in.